Graphics Apps I LURVE! Pixite Assembly

I made a cute thing in Pixite’s Assmebly app. I’m calling these guys “Shroomies,” because they’re squishie and they’re sitting on mushrooms.

Shroomies art

Aren’t they cute?!


If you haven’t used Assembly, it’s really nice and fun. The app gives you a blank art board and a library of shapes to create artwork with. You don’t draw in the traditional sense. Instead, you assemble the shapes like collage pieces to make an image. Assembly lets you set the color, transparency and outline of each shape, and you can also add shadows. You can group multiple shapes together, as well as combine or cut out shapes from each other. And, best of all, if you make a custom shape, or group of shapes (like my little Shroomie creatures above), you can save them in a custom sticker library to use again and again!

Assembly does have a couple limitations. First, it only offers flat colors, not gradients.  To get the gradient effects above, I exported my original artwork as a PNG, and then brought it into Shift, another Pixite app, to touch up the colors and add some scratchy, old-photo texture.

A second issue is the lack of layers. While you can group shapes, the app doesn’t offer layers to make organizing parts of your artwork easier. In other graphics apps, I like to use layers to separate my background, foreground, and mid ground elements, but that’s not an option in Assmbly.

Still, I love Assembly by Pixite! I’ve made some really great artwork in it, and I can always export artwork from Assembly as an SVG, if I want to bring it into Corel Draw or Adobe Illustrator, or another vector graphics app. Assembly is pretty simple to use, and I can do a lot of cool things with it.

Messy Monday – Painted Skulls and a Broken Nose

I had an epic fail on Friday.

Pixie and I were jogging on a local trail, anways behind Princess’ cross country team. The trail in question is steep, with lots of big tree roots crossing it, along with the occasional heavy wooden beam to shore up the steeper parts. Pixie was jogging with the coach’s dog, while I jogged along behind her with Gibbie. I was doing pretty good, jogging faster than I have in a while. I was feeling pretty good.

Then I caught my foot on a tree root and slammed face first into the ground.

The good news is that I did not plant my face into a wooden beam. I hit that with my ribs, instead. The bad news is that I hit the ground HARD, and I knew that as soon as I hit, I had broken my nose.

Apparently, my crash landing was so tremendous it scared the young lady running ahead of me. After checking to see if I was okay (I was laughing as I sat up, despite my smashed nose), she ran off to get Pixie and the team coach. I told the coach I was fine and sent her off to keep track of the girls still running. Pixie stayed with me. According to her, I walked over to a nearby bench, sat down, then tumbled over ass-over-tea-kettle as Inpassed out. I don’t remember doing that, but I do remember having a very brief, pleasant dream that ended with me waking up staring at the grass and Pixie asking me if I was okay.

“Uh, yeah. I’m fine. But why is the world sideways?”

I was able to pull myself together after a few more minutes, and Pixie and I walked a mile back to our car. My nose bled the entire way. As soon as the cross country team came in, I grabbed Princess and we drove home. It took me an hour to clean up. I was covered from head to toe in dirt and dead leaves, along with blood, bruises and scrapes. But I was still laughing, so I was okay.

Later that day, Princess and Pixie asked why I had laughed through all this. I was a real mess. In addition to breaking my nose, I also tore up both knees and one elbow and I broke the big toe on my right foot. Why would I laugh when I did all that? Good question. I’m not really sure of the answer, but I hope it’s because I chose to laugh instead of cry. Yes, it all hurt like hell, but I think crying or even just complaining would have made it much worse. Laughing as soon as I got up seemed to make it feel better. And I think I chose to laugh because I knew that, but I knocked myself so silly, I can’t be sure I actually made that choice.

In any event, I have a couple of photos of the skulls I’ve been painting. I’ve gotten farther along, adding dots of white paint to make patterns. Over the white, I’m adding a bit of metallic paint, and then I plan to add some jewel-tone paints on top of that. What do you think?

Blue skull

I tried making the dots with a paint brush, but found a stylus works better.

Pink skull

This one is my favorite so far!

Yellow skull

This one’s a bit messy, but I’ve gotten farther along with it.


And there you have it! This week’s mess. Yay!

Messy Monday – life is messy and so is my drawing but I love it!

I am doing my best to blog two to three times a week, but things are pretty crazy, as usual. Both girls are home all day, and we’re working all day long to train the puppy. On top of that, Princess has cross country practice Monday through Friday, at 7AM, at a different location every day. Our schedule is such a MESS!

But life is always messy, so I am doing my best to draw everyday and to get at least two blog posts out every week. And they may get posted a little late, but that’s better than not at all!

For this week’s Messy Monday, I thought I’d share a drawing I’m working on. 


It’s a mermaid! I’m drawing this one in Concepts on my iPad Pro. I decided to do this drawing in a deliberately messy style, using Concepts’ filled area tool to draw all the lines as well as other shapes, because I get the best results in Concepts when I draw that way rather than try to create very controlled lines and shapes. I started out using my Apple Pencil when I began working on this piece, but I wasn’t happy with how the Pencil was handling. The tip of the Pencil is so slick, it was just skidding across the screen of my iPad, causing me all sorts of problems, especially lots of stray marks. I mean, I wanted a sort of messy style, but not that messy! 

Desperate to get some sort of control over my stylus, I put my Pencil away and pulled out my old Wacom Creative stylus. Yes, it’s older. Yes, it has the fatter tip. But that tip is made of rubber, and it grips the screen so much better! So I decided to keep working with the Creative stylus.

Then, one evening, when I posted an earlier version of this drawing to Twitter, I happened to mention I was drawing it in Concepts and using my old Wacom stylus to do it. And you know what? The folks over at Concepts saw that tweet and asked me which old stylus I was using. After a bit of conversation about my old Creative stylus and the problems I was having with my Apple Pencil, they asked me if I might be interested in getting the newer Wacom Bamboo Sketch stylus. Uh, yeah I would! And that led to Concepts talking to Wacom, who just happened to be looking to give the new Sketch stylus to a few folks, and whaddya know?! Less than a week later (today, as a matter of fact), a brand new Wacom Bamboo Sketch stylus showed up in the mail!

I’ve been working with the Sketch this afternoon, and used it today on the mermaid drawing above. I like how it handles! The tip is definitely smaller than my old Creative stylus, but it still has a nice feel to it, gripping the screen of my iPad just enough to keep from skidding erratically all over my artwork.

I will post an actual review of the new Sketch stylus sometime in the next week. For now though, I just want to play with it for a while. I have a little free time tonight, which I’m going to take advantage of right now. Because with my messy schedule, you grab that free time whenever you get a chance!

Messy Mondays – An experiment with skulls

So, I’ve decided to start adding some new topics to post about. One of these is something I’m calling “Messy Mondays.” This is a chance for me to show off stuff that I’m currently working on. The idea is that I make a big mess, get my hands dirty making art, and you get to see what I’m doing and maybe how I’m doing it, if I get my act together enough.

For this Monday, I’ve got a trio of skulls that I’m working on!

Messy Monday Skulls

Lovely skulls, yeah?

These are paper-mache skulls that I bought back in October. I wasn’t sure what I wanted to do with them at the time, but I figured it would be something fun. Naturally, the skulls ended up just sitting in a bag tucked away in my stash of art supplies.

But a couple weeks ago, I pulled these babies out and started playing with them! Remember, the idea is for me to make a mess, so I don’t really have a firm idea of what I’m doing, no plan at all. I just picked out some of my fluid acrylic paints and some gel medium and I started brushing on some color. So far, I like what I’ve got.

However, these are far from done. I also have some gel pens, some acrylic inks, and I bought some metallic paints as well, so I plan to keep messing with these skulls for a while longer. I’ll post more pictures as I go, so you’ll get to see how…if… I make any further progress 🙂

Amazing Artists – Rachael Smith!

One thing I love to do is look at what other people make. I love seeing artists post their work on Twitter and Tumblr, and I love finding new artists via Cool Hunting, High Fructose, The Fox is Black, and other online journals.

Most recently, I saw some cover art for Titan Comics’ Doctor Who comic book (the Ongoing Adventures of the Ninth Doctor). I feel in love with the artwork instantly, and made sure to let the artist, Rachael Smith, know. Most of the Doctor’s adventures involve lots of running, being chased by aliens, escaping from certain death, etc. So I loved seeing Rachael’s cover, because it depicted something that was quite different and yet a little closer to home for me. Basically, Rachael drew the archetypical scenario of the family road trip.

This one hit home with me because I had recently dealt with a difficult road trip made even more difficult when my car broke down at the halfway point. Yes, this was the trip to get to my parents’ house when my dad had his heart attack. My sister flew, I drove, and we both ran into one problem after another as we scrambled to get to rural Arkansas, wondering all the way if our dad would still be alive by the time we got there.

When a car breaks down in the middle of a trip, there’s not a lot you can do. You call a tow truck. You get to the nearest service station. And then you wait. For hours and hours and hours. I lost an entire day of travel waiting in Nashville for my car to be repaired. The guys at the service shop were very nice, and worked as fast as they could, but there was already a long line of cars waiting to be serviced when I got there. I couldn’t call my dad – he was in surgery. I couldn’t call my sister – she was flying somewhere over the country. I didn’t want to worry my mom. So all I could do was sit there and wait and do my best to pass the time.

The “road trip” break-down that Rachael depicted is much happier than mine turned out to be.

Rachael Smith 9th Doctor Cover

Rose may be losing the game, but she’s having a much better time than I was!


When I look at it, I get a sense of calm, the kind that comes with the peaceful laziness that happens when you’ve got nowhere to be in a hurry. The colors in Rachael’s artwork are bright and soothing, and I can just feel the late afternoon sun on my face. I also love the fact that Jack has more than a few aces tucked away in his pocket, behind him on the sand, and who knows where else!

Rachael was kind enough to send me a couple of autographed copies of the comic, along with information about her Patreon and Etsy shop. I highly encourage you to stop by and take a look, and please consider supporting her! Artists are amazing people, and generous artists are even more so. Rachael’s gift of these comics to me was such a wonderful kindness, one that allows me to look back on a difficult event in my own life and feel a bit better about it.

If you want to find more of Rachael’s work, or catch up with her on Twitter, Tumblr, or Etsy, here are the links you need 🙂

Web: www.rachaelsmith.org

Twitter: @rachael_

Ask Flimsy: askflimsy.tumblr.com

Shop: etsy.com/shop/FlimsyKitten

(Please note, the trademarks and copyrights for Doctor Who and Titan Comics belong to their respective owners, not to me! Please do not grab the photo of this cover for your own personal use. Again, the comic books were a gift from Rachael Smith to me, and yes, she is very, very wonderful!)

I’m not dead yet!

And no, I won’t soon will be.

I apologize for being quiet for so long. This year has been overwhelming, between volunteer work and taking care of my parents after my dad’s heart attack. However, I am working on getting back into the swing of things.

I’ve gotten back to work on the webcomic, writing scripts and pencilling comics. I’ll probably start inking the first new comic later today. I’ve also been doing a lot of other drawing, so you should be seeing that soon as well.

So I’m coming back! I’m dragging myself back out of the grave and into the light. I hope we’re all prepared for this 🙂

Three quick sketches of me

Three quick sketches

Practice Drawing – Cats, Part Deux

When last we talked about drawing practice, our intrepid artist (i.e. Me) was struggling to doodle the purrfect cat! Ha ha! I’m so funny!

But seriously, I was not happy after my first attempt at doodling a cat. It was supposed to be a simple doodle exercise, and I couldn’t do it. My first thought was that the apps I was using to doodle were not adequate to the job, but these were apps designed for doodling! So I got to thinking, maybe the problem wasn’t the apps. Maybe the problem was that I was overthinking the doodle. I wanted something that looked like a cat, but maybe I was trying to hard too draw a cat, an actual cat as I would see it in my mind.  Maybe I just needed to really get back to the basics.

So that’s what I did. The Paper app actually has a tool that changes my squiggly lines into nice shapes. It’s cheating in a way, because I’m relying on the tool to make the shape rather than my own skill, but drawing precise shapes on an iPad can be tricky, so let’s just acknowledge that I took the best approach to the problem and move on. With the shape tool selected, I started drawing basic shapes – ovals, circles, triangles – and used those to make a few cats.  Here are the results.


I really like these cats! Even though they’re simple shapes, they have personality. And look at their expressions! They’re so cute and goofy! These are the cats that exemplify the simpilicy that I think was the point of the the doodle exercise in Craft-A-Doodle

So I got that exercise done and then I tried the next – making a flag with my doodled pet. Again, the exercise in Craft-A-Doodle suggested drawing a pug, but I love cats, so I drew a cat flag, again using the simple shapes tool in the Paper app on my iPad.


Yep, I even managed to make this kitty a Siamese!

However, I still wanted to see if I could draw cats free-form, without relying on the shape tool in Paper. So I took another stab at it and here’s what I came up with:


These cats are a little different, but they still rely on basic shapes. This time, though, the whole body is a basic shape – rectangle, triangle, oval. And finally, finally, I feel like I really got the point of the exercise. Stick to the basics. Don’t overthink things. Don’t try to hard. And that’s a lesson I think I really need to learn.

Alternate Mii-ality 02 – Ta-Daaah!

After my first attempt at making a Miifoto on Miitomo, I quickly realized there were ways to make it better. For example, tapping on a sticker, character, or other element while setting up a Miifoto, allowed me to layer things in the order I wanted them. That meant I could put effects stickers and word balloowns behind my Mii, instead of blotting her out. It’s a primitive layering system, but it works!

Of course, Miifotos aren’t about the stickers. They’re about the clothes! Yes, the virtual wardrobe you can collect for your virtual character. I quickly became obsessed with putting together the perfect outfits for my Mii. However, my options are limited to what I can pay for with participation coins, any freebies that Nintendo chose to give away, or by what I can win in the Mii-drop games.  This has led to some… Interesting outfits. Like this one.


The only part of this outfit I bought was the shoes. The hat was a freebie from Miitomo during the launch of the app, and rest of it was won in a food themed Mii-drop game. I honestly had no idea what the games were about initially. I just gave them a spin to see what would happen and all of a sudden I had a bunch of weird, food-themed clothing in my virtual closet. The sandwich shirt and skirt do go well together, but I’m not sure if I would wear this outfit in real life…

Oh, who the hell am I kidding?! You know I’d totally wear this! Somebody get me this outfit in real life, STAT!

Practice Drawing – Cats, cats, and more cats!

I am slowly working my way through the book Craft-a-Doodle, playing with the tutorials for drawing fun little doodles. I got stalled on the exercises in the second chapter though, which was about drawing pugs. The tutorial is very straightforward. The problem is, I didn’t want to draw pugs. To me, pugs seemed to be the signature motif of the artist who wrote the tutorials for that chapter – Gemma Correl. Her pugs are adorable, but they’re also her pugs, and I’m not doing this drawing practice so that I can perfectly imitate anotehr artists.

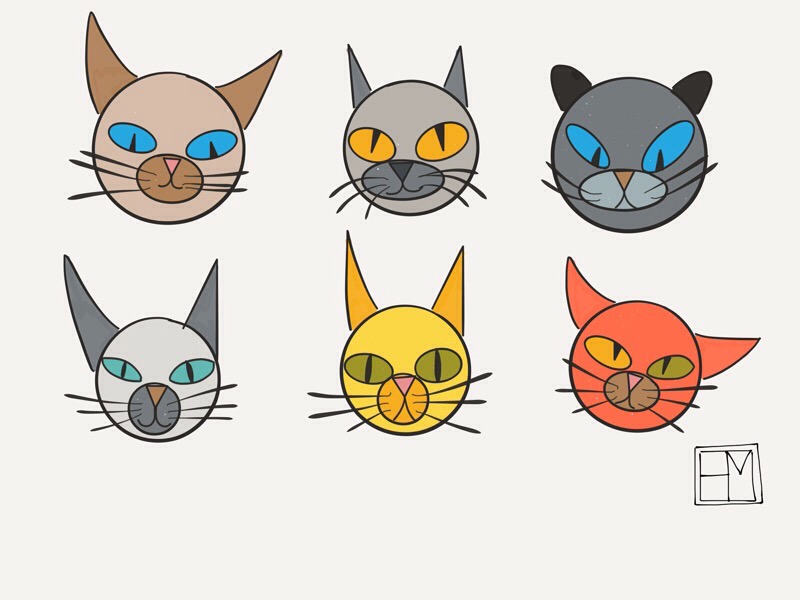
I opted therefor, to draw cats instead. I know nothing about pugs, but I’ve lived with cats all my life. We have three prime specimens in the house right now, in fact! So, after reading through Gemma Correl’s pug-drawing tutorial, I set baout drawing cats.

The basic idea behind Correl’s pug drawings is that they’re very simple and very cute. Everything is composed of basic shapes, mainly circles and triangles. So I tried to stick to that idea when I drew my cats. However, things didn’t quite workout the way I wanted…

I drew my first cat in Paper on my iPad and immediately ran into problems. Paper doesn’t give me a lot of control over how the tools work. I can pick a tool and I can pick the color to draw or paint with, but I can’t make any adjustments beyond that.  And there’s a definite limit to how far I can zoom in. In some ways, that makes Paper the perfect app for doodling, but in others, I feel crippled by the app. I can’t draw as smoothly as I can in other, more sophisticated apps, nor do I have the tactile advantage of working with more traditional media, like markers and card stock. Anyway, I drew the first cat, and here’s how he turned out.


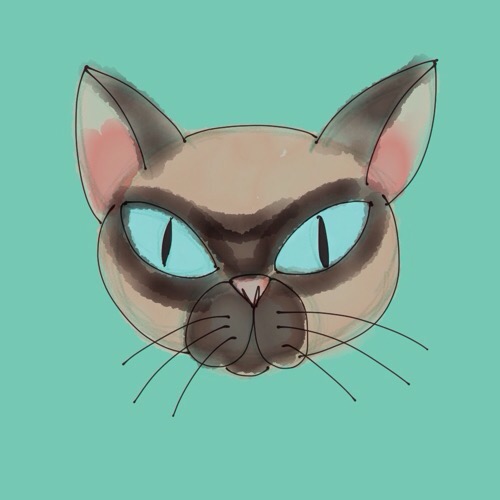
Okay, he’s not bad, but I wanted to draw him with a thicker line and I didn’t have the option to do that. The result was a scratchy little drawing that just disappeared on the page. Since the lines were so thin, I thought maybe coloring him would help him pop out more. I opted to give him Siamese coloring, and discovered that the watercolor brush in paper has some quirks when it comes to blending and layering colors. Frustrated, I decided to redraw my cat in another app.

Here’s cat number two, drawn in Tayasui Sketches. Again, I did a simple pen drawing with watercolor.


To me, this was even worse. The water color blended better, but I had such limited control over the size of the brush that colors were constantly bleeding into areas where I didn’t want them. Keep in mind, I wasn’t using the pro version, of Sketches, although I did pay to unlock all the features in the version I am using, so I’m not sure what the differences is between the two apps. I also don’t know if the pro version would allow me more control over the brush size. That’s something I’m going to ave to investigate. But the biggest problem I had with Sketches was that it worked sooooooooo slooooooowly on my iPad. There was a definite lag between when I drew a line and when it actually appeared. I don’t know what the problem was, but that’s something else I’ll have to look into.

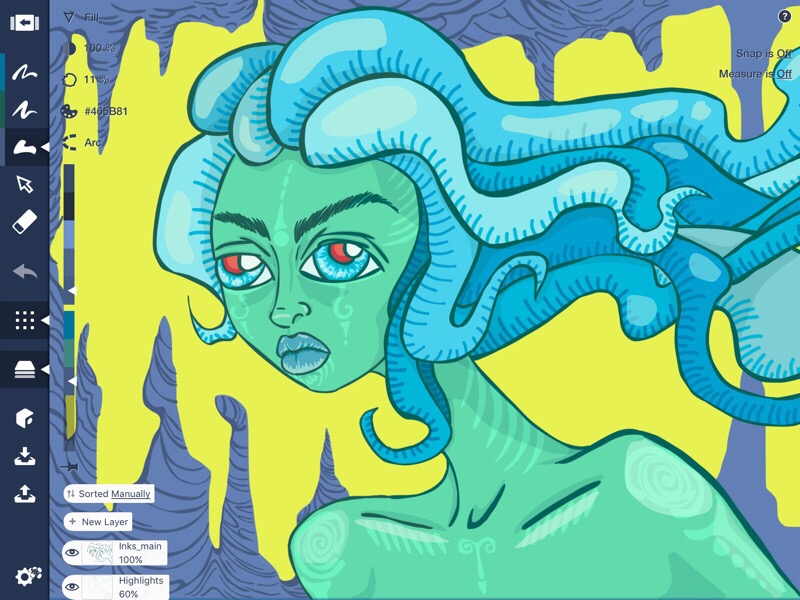
Anyway, frustrated with both Paper and Sketches, I finally opened up my favorite drawing app, Sketchclub, and drew a cat in that. Sketchclub has a pen tool, excelelnt zooming, panning and rotating capabilities, layers, and shape drawing tools. It doesn’t have water color brushes, but it does have plenty of other tools that I think make up for that. And since at this point I was damned and determined to draw a cat the way I wanted to draw one, I ditched the whole idea of a simple doodle and pulled out all the stops to draw a Siamese cat. And here it is!


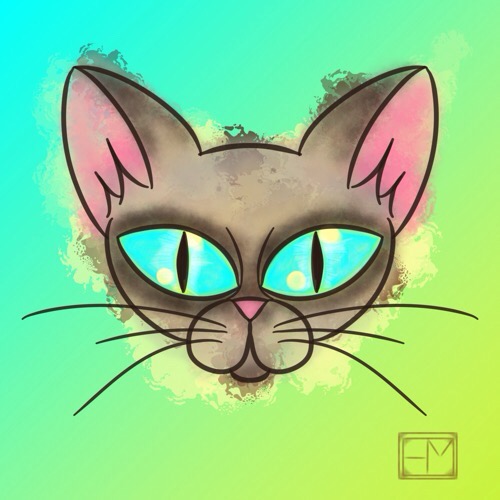
Again, not a doodle at all, and the complete opposite of the point I think Gemma Correll was trying to make, but this was the one cat drawing I was happy with, so there you go.

This is not the end of the cat saga, of course. I had not accomplished the goal of the tutorial, and I refused to be beaten by this, but I did set the tutorial aside for a while. I’ll show you the results of round two next week!